Yoga for Nervous System Regulation | Spring Class 11
In This Series
New here? Read this first!
Yoga for Nervous System Regulation is a unique program combining yogic tradition with neuroscience to help students engage with the nervous system, calm stress responses, and cultivate peace and resilience in body and mind.
Learn more about the program here.
This program is seasonally oriented. Please begin with the first class of the current season. Each class consists of a playlist of 3 practices to be completed in order. The asana (yoga poses) prepare us for pranayama (breathwork) which prepares us for, meditation, which prepares us for life!
Pause the track and practice on your own when prompted, or whenever you need to. Below the video playlist you’ll find pose diagrams and descriptions, and additional resources to optimize the class for all types of learners.
I would love to hear your thoughts and questions. Please submit a comment at the bottom of the page, or follow KMKyoga on Instagram, where I share additional insights, support, and resources with a growing community of fellow practitioners.
Thanks for being here!
Before you begin, please review the Yoga Safety Tips.
Yoga is safest when practiced on an empty stomach, which means no food for 2-3 hours prior to beginning. Please do not drink liquids for ~30 minutes before beginning. Follow practice with water and food.
Please don’t hesitate to ask questions in the comments section at the bottom of the page, or by sending me an email at kath@kmkyoga.org. I’m happy to help with clarifications or modifications to ensure your practice is safe, comfortable, and enjoyable.
Our niyama for this week is svadhyaya, which means “self study.” We’ll use both our asana practice and our meditation as opportunities to study ourselves and our responses. In Pranayama, we’ll introduce ujjayi breath, or “ocean breath”.
Find a quiet space with room to move. You may wish to pause notifications on your digital device. Gather your mat, a sturdy chair, some water, and a blanket. When you’re ready, hit Play on the first video in the playlist – asana – to begin.
Enjoy today’s class!
In This Series
This course is provided on a pay-what-you-can basis. If you value what you find here and want to contribute, make a donation. If you’re not able to donate today, please join us for free.

Get course updates, news, and insights about yoga, meditation, neuroscience, and more in your inbox.
Spring Class 11 Video Instruction
Each class playlist consists of three videos to be practiced in order:
Asana ➙ Pranayama ➙ Meditation
The purpose of asana (yoga pose or “seat”) and pranayama (breathwork) are to prepare the body and mind for meditation, where the real magic happens! I strongly suggest you try the classes in sequence, but after you’ve completed the entire sequence at least once, feel free to revisit individual parts as you’d like.
Once you complete a video, the player will automatically advance to the next one in the playlist. You can skip to the next video at any time using the next/previous arrows at the bottom of the player window, or by clicking the icon in the top right corner.
Asana (Pose) Descriptions
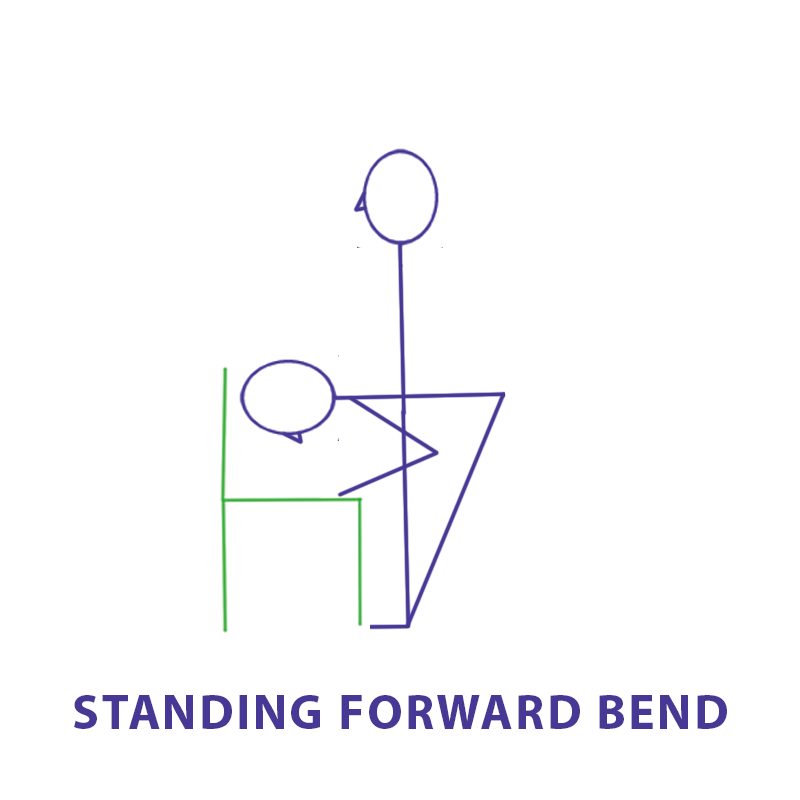
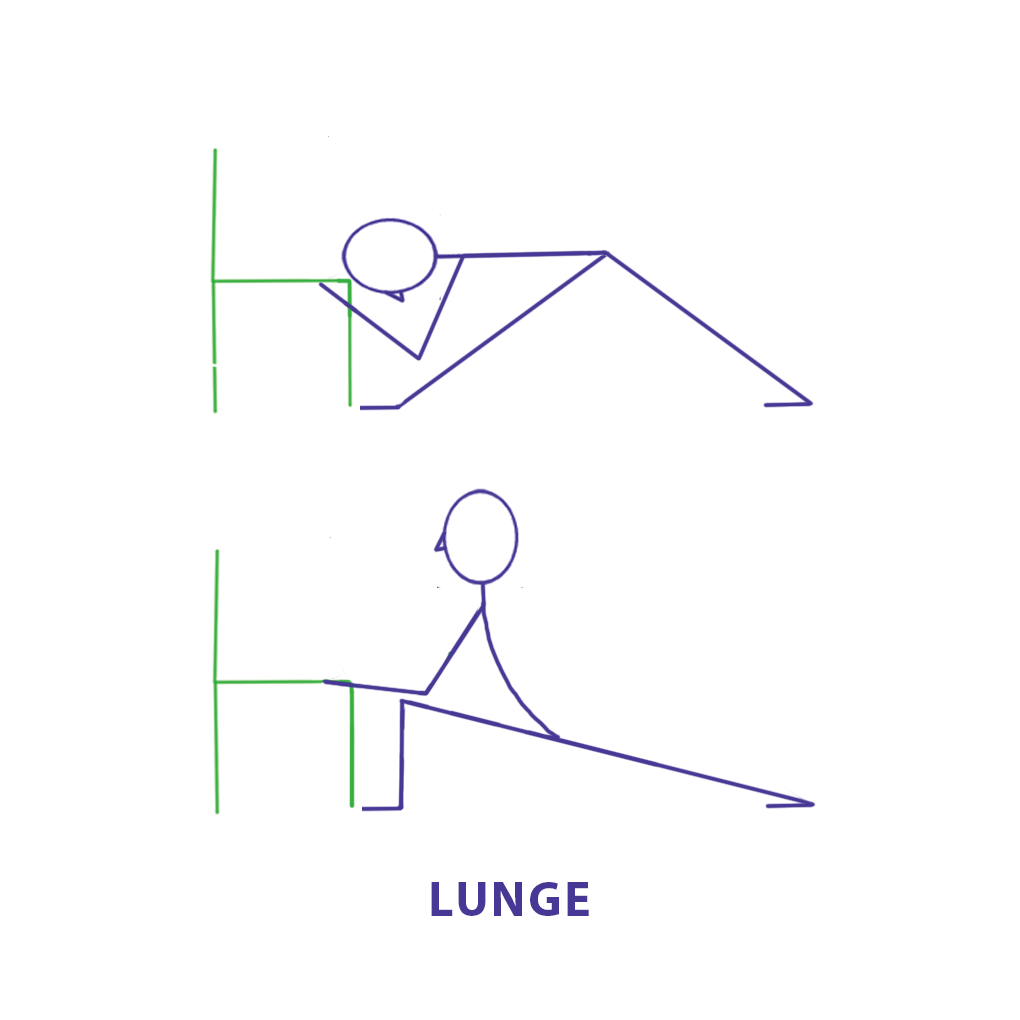
The following diagrams are offered as a supplement to today’s asana practice. Use them to quickly reference specific poses in the video, review verbal instructions in written form, and clarify details from the class. Scroll within each text box for transcript excerpts with time stamps indicating when each pose is demonstrated in the Asana Video for today’s class.
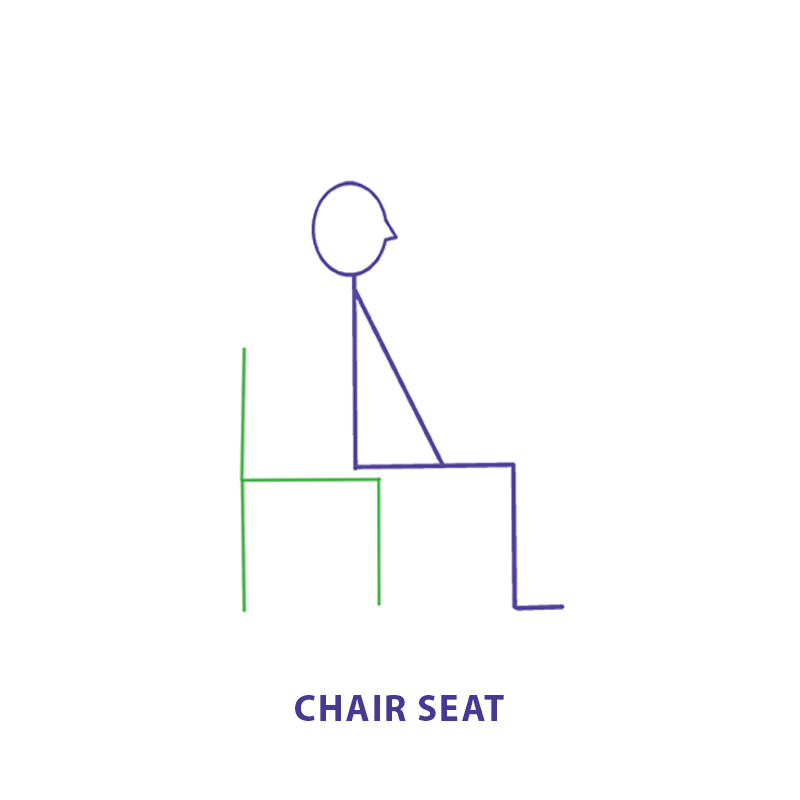
0:02:31:19 – 00:03:01:22
It’s always the same sits-bones, hip width apart, knees over heels and feet or parallel. Pull your feet a little bit toward you without moving them. Feel the pelvis engage until it lets your spine stack up on top of the sacrum and your chin might lift a little bit and then take a long, gentle inhale that makes you taller.
00:03:02:00 – 00:03:09:21
And on exhale, close eyes.
Bring your attention to the breath moving through your nose,
throat
chest,
belly.
00:03:33:22 – 00:03:59:04
And then the spot that I call the little triangle at the junction of the ribs at the bottom of the breastbone, right at the ziphoid process between there and your navel, your belly button if you like, as you can feel your diaphragm moving with breath, you can use your hand. I suggest the center of your palm, or you can feel it from the inside.
00:03:59:06 – 00:04:09:07
Feel your diaphragm going up and down, and then feel your whole torso breathe
00:04:17:08 – 00:04:47:23
with your next inhale. Bring eyes open. That practice, you’ve heard it so many times. I use it almost like an invocation, because in some ways, yoga is a bit of a ritual. You can assign the purpose to that ritual yourself, but you can also use that practice when you need to regulate your nervous system. It doesn’t take but 2 or 3 minutes and you can sit and just notice breath in different parts of your body.
00:04:48:03 – 00:05:22:05
You might remember the order I use; you don’t have to just watch different parts of your body respond to breath and you’ll feel your nervous system begin to sort of smooth out to leave that sympathetic nervous system activity and dip down into the parasympathetic where the nervous system is not irritated, not over stimulated.
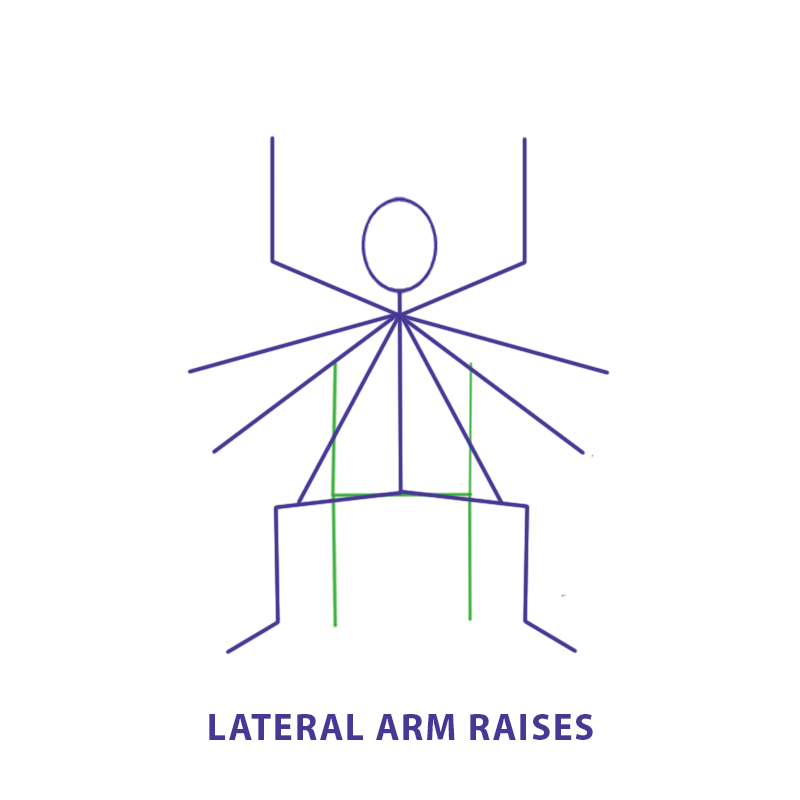
So let’s check out body. We’re going to check out from the, pardon me, from your navel up.
00:05:22:07 – 00:05:54:12
Our arms are hanging down. Remember, not slumped, not military. Let your arms hang freely. Exhale here and inhale up soft and gentle. Tune into your breath. Because you know this motion by now, can you make your inhale last the length of your movement? Can you make the exhale last the length of the movement? You might have to move a little faster
00:05:54:14 – 00:06:14:01
or maybe you need to breathe a little slower; adjust, tweak it. So pause the video and try a few of the arm movements at your own pace.
00:06:14:03 – 00:06:45:20
So, you know, I’m going to say notice. Notice how you feel. Notice what your breath is doing. Notice any sensations in the parts of your body that moved or even the ones that are pretty close and adjacent? If that felt good, let’s move on to making sure our backs are stretched out. I found myself mentioning to my in-person students yesterday that – this in the winter time – this is what I do when I get out of bed before I even make it to my mat, which is pretty much the first thing I do every day.
00:06:45:21 – 00:07:08:20
If my back is stiff from the cold, from being not extra young, you know, I stretch out my back and this is how I do it. But we’re going to use it also today to test out the back we brought for class today. So we’re going to inhale here. Again, I’m lined up. Chin is lifted. We’re going to keep the torso straight and hinge at the hips,
00:07:08:20 – 00:07:42:15
your elbows open to inhale here and, hinging at the hips, exhale forward. Stay straight as long as you can. And then begin to curve down from the tailbone up, ultimately letting your head hang. Bring your attention to your belly as you take a long inhale. And on exhale, soften the belly and feel the low, low back. lengthen from the tailbone toward the head.
00:07:42:17 – 00:08:18:14
Bring your attention to the upper belly as you inhale. And on exhale let the upper belly soften. And that lengthening of the spine will extend up to about the bottom of your ribs. And then inhale into chest and shoulders. And on exhale, soften. Let your shoulders be limp, your neck soft and head hang freely. Take a long inhale that fills the whole torso.
00:08:18:16 – 00:08:37:10
And exhale soften. Then press down with the feet. Straighten and inhale up. And then you can walk your feet back in.
00:08:37:12 – 00:09:02:17
So take a moment to notice how your back is feeling, your whole spine. Upper body, lower body, notice. And then we’re going to have some fun. Svadhyaya we’re going to use that today with some count and respiration. And so what I’d like you to do before you even stand up and begin moving is check in with the breath that you have counted.
00:09:02:19 – 00:09:29:04
Notice the exhale can be a little longer than the inhale, but a good rule of thumb is equal. There have been neuroscience studies that show that if you can do a 5 5 breath pattern, 5 + 5 is 10 seconds. So, of course, there’s six in a minute. And if you can sustain that for about 5 minutes, that you will begin to regulate your heart rate variability.
00:09:29:06 – 00:09:54:23
Heart rate variability is the natural process where during inhale your heart rate is a little faster and then during exhale it’s a little slower. It’s meant to be that way. If we don’t have viable heart rate variability, they’ll be the same. The heart rate will be the same, not the breath pattern. So this is kind of good for your heart.
00:09:54:23 – 00:10:20:07
It’s good for your nervous system as well. They’re closely linked. So check out your breath, maybe a hand, the palm overtop of your diaphragm, or just notice from the inside and count your inhale, count your exhale for about three passes to see how high you can go. Remember, ego is not your amigo and we are not going to cause any harm.
00:10:20:09 – 00:10:36:06
So if you have a choice between a higher number and a lower, go lower. Be kind to yourself. In yoga, we don’t really try hard. We try soft. So take a moment and do that.
00:10:36:08 – 00:10:56:05
Okay, so now you have a number. Maybe it’s three and three, four and four, five and five. We’re going to use that for the rest of our practice. I’m going to move my chair and lay out my mat.
00:10:56:07 – 00:11:01:01
I feel really
00:11:01:03 – 00:11:27:11
Feel that safety is really important. I’m used to watching my students and pointing out when they’re doing something that has the potential to harm them and I really can’t see you. And so I’m going to keep mentioning safety ideas as we go. In case you’ve forgotten from last video, when you lay out your mat, I want your at least the front legs of the chair on the mat to hold it down.
00:11:27:13 – 00:11:56:17
And I want your chair to be heavy and sturdy and up against something. It could be the sofa, it could be a wall. Doesn’t matter. But I don’t want this chair going anywhere. Neither do you, for safety. So come in very close to your chair, feet are hip width apart. We’re going to use the breath pattern. I’m going to use a four just to demonstrate.
00:11:56:19 – 00:12:36:23
But when we pause, you are going to use your own breath pace. So I’ll exhale here. Same arm motion that we used a moment ago. Inhale up 2 3 4, down 2 3 4. Soften the belly up 2 3 4, down 2 3 4, soften the belly. Always hang from your tailbone. It’s like a little gift in forward bend that you can give your back a little length and
00:12:37:01 – 00:13:11:16
stretch each time. So use your breath pace. Try a few standing forward bends using that breath pace. If it becomes a challenge, stop, stop. But notice. Just notice what it’s like today and then you’ll have something to compare it to tomorrow or the next time you practice. So pause the video and try a couple of those.
00:13:11:17 – 00:13:38:13
So notice how you feel when you add breath. Focus. One of the things that might surprise you is you might feel a little warmer than you usually do just from doing forward bends. Yes, you were breathing, but you’re really coordinating your cardiac and your respiratory system, really synchronizing them. And the body notices that, notices that as good work.
00:13:38:15 – 00:14:24:07
So let’s add the lunge just to warm up for the fun pose we’re going to use. So inhale here. We can count these if you like, but you’ll use your pace. Inhale 2 3 4, exhale 2 3 4. Hang no breath, and then inhale 2 3 4. Just pause and enjoy that for a moment. And then lying on your front thigh, straighten the front leg and exhale 2 3 4. And hang.
00:14:24:09 – 00:15:14:13
Inhale, 2 3 4. Exhale 2 3 4. Soften and hang. And then inhale 2 3 4. Then pause and enjoy that for a blink. Lay on your front thigh, straighten that leg and exhale 2 3 4. Hang and inhale to three four. So if that wasn’t clear, just watch it again until you’re really comfortable with where you move and when and where the breath goes in. Don’t beat yourself up
00:15:14:13 – 00:15:45:20
if it’s hard. It is hard to learn a new routine and to coordinate breath and movement. That’s not something we do a lot in our culture. So give yourself some space to play with it. Watch it again. Or if you’ve got it, do it. But I’d like you to pause when you’re ready and do a few on your own just to notice what it feels like.
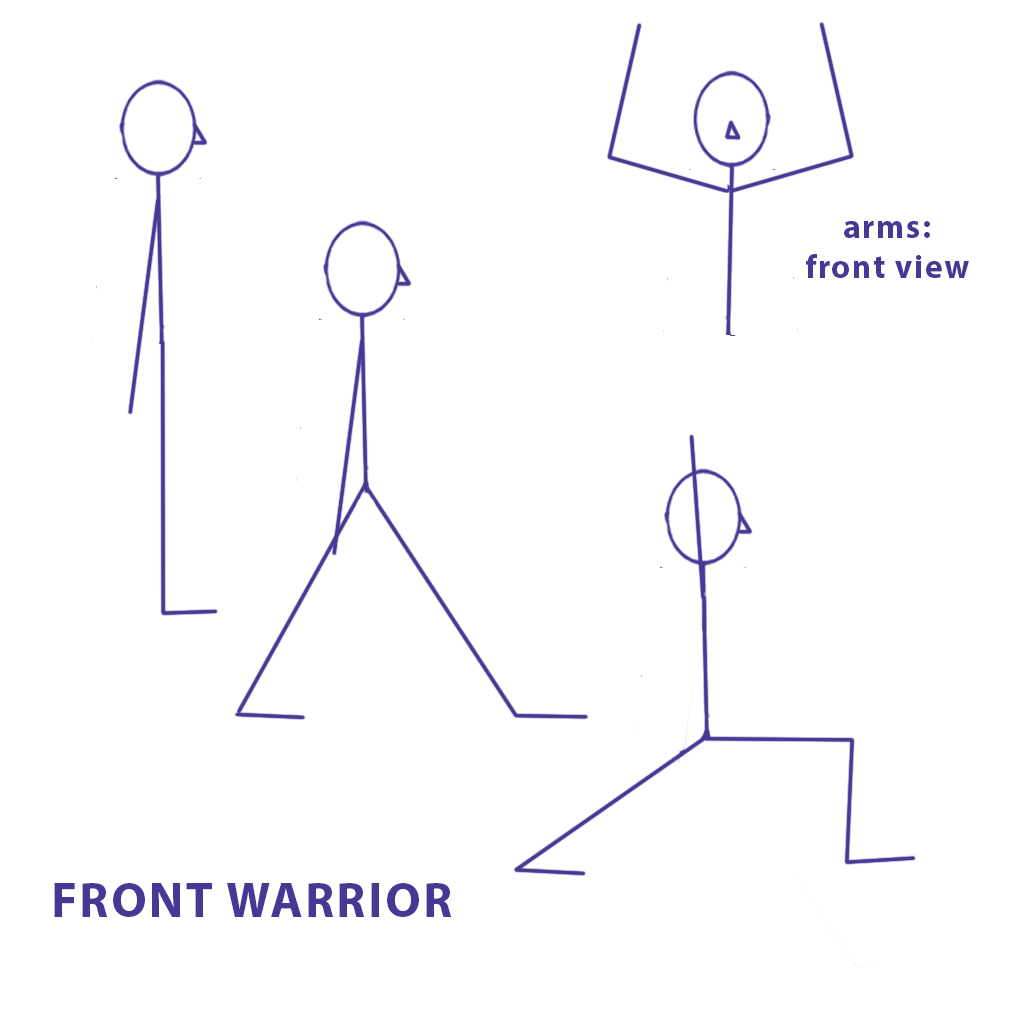
00:15:45:21 – 00:16:13:10
Okay, so notice how you feel. Notice what your breath is doing. Now notice any messages your body’s giving you. And if the body is saying its too tired or something hurts, give it a break. Just give it a break and maybe do a little less next time. So we’re going to move on to another pose that’s really fun for exploring breath.
00:16:13:12 – 00:16:21:09
I’m going to move my chair out of the way because I’m turning the mat to face you.
00:16:21:11 – 00:16:33:11
You don’t need to turn your mat. You can stand in front of your chair
00:16:33:13 – 00:17:00:04
and I’m standing at the back of my mat. Feet are still hip width apart and parallel. You may have seen this pose. I’m going to step one leg forward. You might have seen folks turn that back heel in. I don’t want you to turn your back heel in. I want you to keep the feet parallel to the long side of the mat.
00:17:00:06 – 00:17:23:21
If your balance is wobbly, as mine appears to be at the moment, you can do that little chicken walk and take the front leg a little wider. To give yourself a wider base of support. You need to be able to balance in this pose without gripping with your toes. You’re going to move a little, but not if you feel really wobbly here.
00:17:23:23 – 00:17:44:13
The next part’s not going to be easy. One of the things we’re going to do with this pose is bend the front knee to overtop of the heel. I want you to practice that when you can look at it, because you won’t be able to see it when we’re practicing. You certainly never want to take your knee past the center of your foot.
00:17:44:15 – 00:17:59:17
That puts strain on the ligaments around the knees. It’s just not sturdy. So practice that for a moment
00:17:59:19 – 00:18:21:13
and then we’re going to use a different arm motion. We have been lifting up to the sides; this time we’re going to keep the palms facing each other and come up to the front, but you keep your shoulders and neck soft. So we’re not doing this. We’re coming up very gently.
00:18:21:15 – 00:18:48:06
So check that out. You don’t want to be halfway up in the air and find out that you didn’t bring happy shoulders today. Just make sure this motion is okay. All right. So exhale here. And as you bend the knee, keep that back heel well-grounded and inhale up, exhale down, the arms come down, and the knee is straight.
00:18:48:06 – 00:19:13:22
When the arms are all the way down, that’s another source of focus. You’re making a long motion with your arms. You’re making a short motion with your knee, and you want them to start and end at the same time. Focus is really important in yoga. When we get to the other parts of yoga that we talk about in the pranayama audios, you’ll have a better understanding of that.
00:19:14:00 – 00:19:48:17
So exhale here and the knee bends and the arms come up. Inhale. You can look up at your hands if you’re neck’s happy and then exhale back down. So try a few of those without your breath practice and see how that feels. Pause the video and try a few.
00:19:48:19 – 00:20:08:09
So you have the motion now. Now I’d like you to put it in your breath number. You might want to check it out again. It might not be the same as when you were doing the forward bends and lunges. Chances are it probably is very close. I’m going to use 4/4 again, just to show you how it goes.
00:20:08:11 – 00:20:50:00
So same motion. Exhale here and bend the knee. Inhale 2 3 4. Exhale 2 3 4. Inhale 2 3 4. Exhale 2 3 4. So whatever your breath pace is for today, I like you to try a few like that. So pause the video and give it a whirl.
00:20:50:01 – 00:21:21:02
So take a moment and notice how you feel. And we’re going to make it just a little more tricksy. I’m going to show you how to do a stay. And if your breath practice is a 3 or 4, you can practice along with me. But watch the first one, please. So exhale here. Inhale 2 3 4. Stay. Exhale 2 3 4.
00:21:21:02 – 00:22:01:08
Stay. Inhale 2 3 4. And exhale down 2 3 4. So you’re essentially taking a full breath when you’re in the full position. And you’re going to notice changes in your torso, changes in the support for the move. You’re going to notice all those things. You’re going to notice challenges to balance. Just kind of go with it. So pause and try a few of those on your own.
00:22:01:10 – 00:22:28:21
So notice how that felt. And if it felt pretty good, you feel you have enough energy and your body is pretty happy with the movements we’re doing. I’ll show you how to extend it to a 3-breath hold. The pose is very simple. That’s a really great container for a breath practice. So I’ll show you the whole thing. And then you can try it on your own.
00:22:28:23 – 00:23:21:21
Exhale. Here. Inhale 2 3 4. Exhale 2 3 4. Inhale 2 3 4. Exhale 2 3 4. That’s one. Hold. Inhale 2 3 4. Exhale 2 3 4. Inhale 2 3 4. Exhale 2 3 4. Inhale 2 3 4. Exhale 2 3 4. I need to catch my breath for a minute because you can’t talk and inhale. So I’m going to do the third. That was 2 holds. And I’m going to do the third hold in a moment.
00:23:21:23 – 00:24:24:15
Okay. Inhale 2 3 4. Stay 2 3 4. Inhale 2 3 4. Exhale 2 3 4. Inhale 2 3 4. Exhale 2 3 4. Inhale 2 3 4. Exhale 2 3 4. Give that a try. If you find you feel too wobbly or your breath is erratic, you don’t need to do so many holds. See what happens. And when you finish, you shift your weight forward to jump back. So try a few of those and then start the video up again and we’ll do the other side.
00:24:24:17 – 00:24:58:21
So that was probably the most challenging breath practice you’ve done in all of the 11 series, 11 classes we’ve done. Let’s try the other side and see how we feel. So I’m starting again, hip width apart. I’m going to step the other foot forward. Whichever that is for you. Soften your belly to find your balance. That feels a little counterintuitive, but when we get to the balance series for winter, you’ll understand more about what I mean.
00:24:58:23 – 00:25:20:22
Check out your new motion. Don’t want to go too far. We’re going to keep in mind, too, that we are not symmetrical creatures. What is simple on one side might not be as simple on the other side. And we’re just going to go slowly and gently to make room to notice that. Let’s start with the simplest part of all. Back leg
00:25:20:22 – 00:25:54:22
stays straight. Heel stays grounded. Exhale. Here. Inhale 2 3 4. Exhale 2 3 4. Try a couple of those, pause and try a couple. And then we’ll move right into the breath holds back. Notice how that felt? And really respect your body if for any reason that wasn’t comfortable. Let’s not do more of what’s not comfortable. Maybe you’ll go back and do more lunges, more forward bends.
00:25:55:00 – 00:26:16:12
Maybe it’s your balance and you just needed to go a little wider. But you need to be comfortable and feel safe. That’s the whole idea of ahimsa, no harm is we want to be safe enough to explore our bodies, our nervous systems. So let’s do the 3-breath hold, one hold, then two holds, then three holds.
00:26:16:14 – 00:26:35:19
You can do it along with me if your breath hold is in the three-four range. Or you can watch and do it along with me. Or you can watch and do it by yourself.
00:26:35:20 – 00:27:20:01
So we’re going to do one hold, then two holds, then three holds. But I want you to not push yourself. If this is uncomfortable in any way, respect your body. So exhale here and the knee bends. Inhale 2 3 4. Stay and exhale 2 3 4. Stay and inhale 2 3 4. And exhale 2 3 4. Now that was one hold. Inhale 2 3 4. Stay and exhale 2 3 4.
00:27:20:01 – 00:28:14:18
Stay and inhale 2 3 4. Stay and exhale 2 3 4. Stay and Inhale 2 3 4. Stay and exhale, I mean, down, exhale 2 3 4. And now we’re going for three. Inhale up 2 3 4. Stay and exhale 2 3 4. Stay and inhale 2 3 4. Stay and exhale 2 3 4. Stay and inhale 2 3 4. Stay and exhale 2 3 4. Stay and inhale 2 3 4. Exhale down 2 3 4. Shift your weight forward and jump back.
00:28:14:20 – 00:28:37:12
If you were practicing along with me, you can notice now how you feel. If you were watching so that you could do it on your own at your breath pace, give it a try. You can pause for that if you like.

00:28:37:14 – 00:28:52:13
Okay. I’m going to move my chair back and we’re going to sit down and close out with breath awareness.
00:28:52:15 – 00:28:59:01
Same seat, always the same seat
00:28:59:03 – 00:29:23:22
and hands rest. So as you go through your breath awareness, practice is the same one that I begin and end with. The ending one is a little more elaborate. You can use this practice any time. You’ll begin after a while to just know what I’m going to say next, which means you can use it when you need to soothe your nervous system.
00:29:24:00 – 00:29:53:07
When you’re feeling a little overstimulated. You can also use the breath to notice body as you inhale and relax the hip into the leg. You’ll begin to notice if you’re feeling more energy, if you’re feeling a little bit like you notice what worked today. All good stuff. So use this opportunity to use breath awareness to be aware of the whole system if you can.
00:29:53:09 – 00:30:22:18
But if you’ve not tried this much before, breath awareness all by itself is good enough. So find your seat, Pull in your feet, stack your spine up, lift your chin a little. Let the arms rest wherever they’re loosest and most comfortable. Take a long, gentle inhale that makes you taller. And on exhale soften anywhere you know you hold tension.
00:30:22:20 – 00:30:51:03
Bring your attention to the breath in your nose and on exhale, soften your cheeks, smooth forehead. Let your gaze be soft so that the little muscles around your eyes can slow down, quiet their activity,
00:30:51:05 – 00:31:14:22
and then bring your attention to the breath moving through your throat. And on exhale, soften the space between ears and shoulders. Let your neck be long and supple. Your chin might come up a little bit. That’s okay.
00:31:15:00 – 00:31:20:20
Bring your attention to the breath. Moving your chest.
00:31:20:22 – 00:31:33:23
And on exhale, soften that shoulder arm connection so that the arms can be a little more soft, a little more limp.
00:31:34:01 – 00:31:54:12
Bring your attention to the breath moving your belly. And on exhale, soften that hip-leg connection. Feel that sense of being balanced on top of your torso, your tailbone, your torso balanced.
00:31:54:14 – 00:32:10:21
And then come in to the little triangle between breastbone and navel. And watch yourself breathe.
00:32:10:23 – 00:32:36:02
And then with your next inhale, bring eyes open. So notice how you feel. Breath is amazingly powerful. You can use that any time you like. Well, it’s not a good idea to close your eyes if you’re driving, but for the most part, you can use that any time you are feeling a little overstimulated or your nervous system is a little bit irritable. And it’s a good way to end practice.
00:32:36:04 – 00:32:53:08
So if anything we did today raises any questions for you, please leave comments. Leave questions under the video on the website or on social media, and I will try very hard to get back to you and answer your questions. Thank you.
Comments or questions?
I’d love to hear about your experience with this week’s class and address any concerns you may have. If you’d prefer to reach out privately, send me an email at kath@kmkyoga.org.
Hi, I’m Kath. I teach yoga, breathwork, and meditation as a path to greater somatic awareness and nervous system regulation. Through this practice, I have learned to care for myself so that I can live more peacefully and more purposefully in my body, my mind, and the world. Read my full bio here.
I created KMKyoga for people like me, who can benefit tremendously from yoga but need an option that doesn’t break their bodies or their budget. All KMKyoga classes and learning resources are funded by donations. Learn more.